Today’s blog post takes a look at some of the programming concepts used in the #7 Jeremy Blum ‘Arduino tutorial series’ video.
The Arduino exercise in the #7 video uses a Microchip Technology TC74A0-5.0VAT temperature sensor to acquire temperature data and display it on the computer to which your Arduino circuitry is connected. To do these two tasks, you’ll need two programs. An Arduino program will be used to grab and transmit the temperature data. Then a Processing program will be used to take that temperature data and display it in the specified font on your computer’s monitor.
The Arduino program Jeremy wrote is called read_temp.pde. He makes the programs for the video tutorial series available online, but you’ll gain a lot more skill with Arduinos if you type the programs yourself rather than downloading them, at least while you’re learning new programming concepts. Arduino.cc explains the .pde files from the Arduino IDE (Integrated Development Environment) this way:
To have the Arduino get the temperature data from the Microchip sensor, which is done with read_temp.pde, Jeremy starts out by importing the I2C library. For Arduino this is the Wire library. Importing the Wire library is done with the command:
#include <Wire.h>
Next you set the I2C temperature address. For the sensor he used, the I2C address ID was 72, per the #6 video.
int temp_address = 72;
In the setup section for the sketch, you have to start the serial communication and initialize the Arduino listening on I2C communication bus, using:
Serial.begin(9600);
Wire.begin();
The loop section of the sketch has the components shown below. I won’t write out all the code here -- when you go through the exercise, you’ll get a chance to learn what’s needed to accomplish each task shown in the list of loop section comments below.
//Send a request
//Start talking
//Ask for Register zero
//Complete transmission
//Request 1 byte
//Wait for response
//Get the temperature
//Convert from Celsius to Fahrenheit
//Print the results
//Delay, then do it again
After the above steps are all written for the Arduino sketch, you upload it to your Arduino. Following a successful upload of the Arduino sketch, you’ll see the current temperature of the sensor displayed in a terminal window. Jeremy then puts his finger and thumb over the sensor to confirm that the sensor can measure the difference between the room air and Jeremys skin temperature. To get a temperature display other than just in the terminal window, you need to write a Processing sketch. This will display on your computer monitor the temperature results generated by the temperature sensor circuitry and the Arduino sketch. The Processing file Jeremy wrote to display the temperature on the computer’s monitor is display_temp.pde.
Associated with display_temp.pde is the .vlw file AgencyFB-Bold-200.vlw. The .vlw file type is a font file created by the Processing language. Processing will create the .vlw data file for a font that’s on your computer system when you use the Tools / Create Font command. After you create the data file you can use it in your Arduino / Processing program with the loadFont() function. If you want to dig into the loadFont() function in Processing, two resources are the relevant Processing reference webpage and a tutorial from Purchase College.
Start out by selecting Tools / Create Font in the Processing sketch window. Select one of the font styles shown in the Create Font window. Next, select the font size you want to use. Jeremy selects 200 for the size so it will create a large font on the computer monitor. When you click OK in the Create Font window, it will create a .vlw file for the specified size font.
Next, write the initial components of the code shown on the video, including things like defining the variables for the program, then do the setup and draw sections of the sketch. After the initial components of the sketch are written, you setup the ‘canvas’ where you’ll display the font, using the command:
size (400, 400);
After setting up the canvas, set up the serial port, using the command:
port = new Serial(this, “COM3”, 9600);
Once the serial port is set up, you tell it to keep looking for information until it gets to the end, which has been defined by a period. You tell it to look for that info with the command:
port.bufferUntil(‘.’);
Next, set up the font, specifying the .vlw file that you created earlier, using the commands:
font = loadFont(“AgencyFB-Bold-200.vlw”);
textFont (font, 200);
I think the 200 is optional in the second line, since the .vlw file specified already defines that it’s a 200 point font. I don’t know if you can use a non-sized font file in the loadFont function, such as AgencyFB-Bold.vlw, then specify the size in the textFont function. Haven’t had time to dig into that Processing function yet; maybe a blog post reader can point out where the Processing.org website explains that, or I might research it in the future. For now, I’ll just type it the way Jeremy did.
Next, write the commands for the draw section of the sketch, which tells the computer what characters to display on the monitor. Do this with the background, fill and text commands. Per the discussions in the recent blog post, “#7 Jeremy Blum Video: I2C And Processing,” you’ll have to use an RGB color chart or list to specify what color you want the background and the text. You also have to specify which variable strings (temperature labels to go with the temperature data) the Processing sketch should ‘draw.’
Now write the serialEvent section of the sketch to grab the temperature data off the serial port, then use a substring command to reformat the information by removing the period at the end, using the commands:
data = port.readStringUntil(‘.’);
data = data.substring(0, data.length() - 1);
Next you write the code for finding the comma in the string, for fetching the Celsius data and Fahrenheit data (as shown in the video).

Once you’re done writing the Processing sketch as described above, click on the Run icon in the Processing sketch window and your computer should display the temperature currently being
measured by the Microchip temperature sensor, as captured and transmitted by your Arduino. If it doesn’t display the temperature, review your code versus what Jeremy shows in the video and make any needed changes in your code so it matches his code. Good luck on not needing any debugging!
Hope to see you at the July 10th meeting for the Humboldt Microcontrollers Group, 6 - 8 PM at 1385 8th Street, Arcata, California. The main topic for the meeting is discussing the I2C and Processing concepts used in the above temperature sensing exercise, as well as any problems people had with the exercise, and maybe some interesting I2C, Processing, or temperature sensing tips and tricks people know of or discovered in the past two weeks.
Read More..
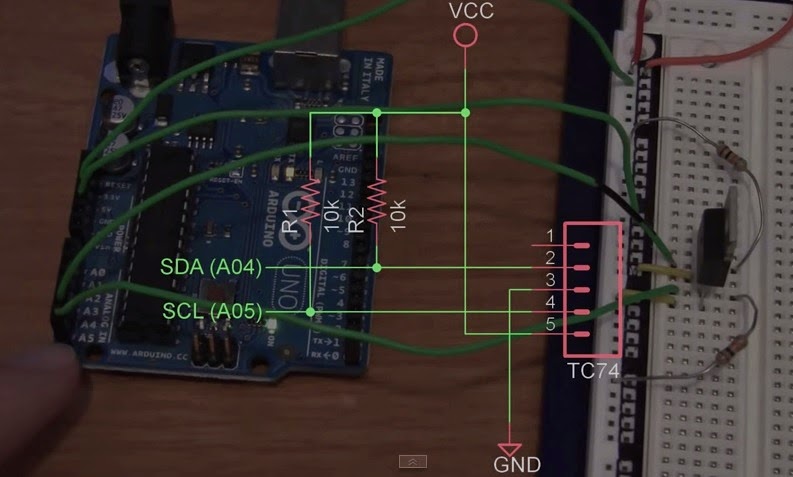 |
| #7 video exercise Arduino circuitry |
The Arduino exercise in the #7 video uses a Microchip Technology TC74A0-5.0VAT temperature sensor to acquire temperature data and display it on the computer to which your Arduino circuitry is connected. To do these two tasks, you’ll need two programs. An Arduino program will be used to grab and transmit the temperature data. Then a Processing program will be used to take that temperature data and display it in the specified font on your computer’s monitor.
The Arduino program Jeremy wrote is called read_temp.pde. He makes the programs for the video tutorial series available online, but you’ll gain a lot more skill with Arduinos if you type the programs yourself rather than downloading them, at least while you’re learning new programming concepts. Arduino.cc explains the .pde files from the Arduino IDE (Integrated Development Environment) this way:
“The Arduino environment uses the concept of a sketchbook: a standard place to store your programs (or sketches)...Beginning with version 1.0, files are saved with a .ino file extension. Previous versions use the .pde extension. You may still open .pde named files in version 1.0 and later, the software will automatically rename the extension to .ino.”So the reason Jeremy’s read_temp Arduino file is has a .pde extension instead of .ino is because the video is a couple years old, and he was using an earlier version of the Arduino IDE. The current IDE version is 1.0.5, with the Beta version being at 1.5.7. The .pde file extension (Processing Development Environment) is the one used by the Processing, Wiring and early-version Arduino IDEs. Processing is often used as an educational tool to teach foundational programming skills in a visual environment and is Java based rather than C.
To have the Arduino get the temperature data from the Microchip sensor, which is done with read_temp.pde, Jeremy starts out by importing the I2C library. For Arduino this is the Wire library. Importing the Wire library is done with the command:
#include <Wire.h>
Next you set the I2C temperature address. For the sensor he used, the I2C address ID was 72, per the #6 video.
int temp_address = 72;
In the setup section for the sketch, you have to start the serial communication and initialize the Arduino listening on I2C communication bus, using:
Serial.begin(9600);
Wire.begin();
The loop section of the sketch has the components shown below. I won’t write out all the code here -- when you go through the exercise, you’ll get a chance to learn what’s needed to accomplish each task shown in the list of loop section comments below.
//Send a request
//Start talking
//Ask for Register zero
//Complete transmission
//Request 1 byte
//Wait for response
//Get the temperature
//Convert from Celsius to Fahrenheit
//Print the results
//Delay, then do it again
 |
| Warming temperature sensor; terminal window temperature display |
Associated with display_temp.pde is the .vlw file AgencyFB-Bold-200.vlw. The .vlw file type is a font file created by the Processing language. Processing will create the .vlw data file for a font that’s on your computer system when you use the Tools / Create Font command. After you create the data file you can use it in your Arduino / Processing program with the loadFont() function. If you want to dig into the loadFont() function in Processing, two resources are the relevant Processing reference webpage and a tutorial from Purchase College.
 |
| Creating a font in Processing |
Start out by selecting Tools / Create Font in the Processing sketch window. Select one of the font styles shown in the Create Font window. Next, select the font size you want to use. Jeremy selects 200 for the size so it will create a large font on the computer monitor. When you click OK in the Create Font window, it will create a .vlw file for the specified size font.
Next, write the initial components of the code shown on the video, including things like defining the variables for the program, then do the setup and draw sections of the sketch. After the initial components of the sketch are written, you setup the ‘canvas’ where you’ll display the font, using the command:
size (400, 400);
After setting up the canvas, set up the serial port, using the command:
port = new Serial(this, “COM3”, 9600);
Once the serial port is set up, you tell it to keep looking for information until it gets to the end, which has been defined by a period. You tell it to look for that info with the command:
port.bufferUntil(‘.’);
Next, set up the font, specifying the .vlw file that you created earlier, using the commands:
font = loadFont(“AgencyFB-Bold-200.vlw”);
textFont (font, 200);
I think the 200 is optional in the second line, since the .vlw file specified already defines that it’s a 200 point font. I don’t know if you can use a non-sized font file in the loadFont function, such as AgencyFB-Bold.vlw, then specify the size in the textFont function. Haven’t had time to dig into that Processing function yet; maybe a blog post reader can point out where the Processing.org website explains that, or I might research it in the future. For now, I’ll just type it the way Jeremy did.
Next, write the commands for the draw section of the sketch, which tells the computer what characters to display on the monitor. Do this with the background, fill and text commands. Per the discussions in the recent blog post, “#7 Jeremy Blum Video: I2C And Processing,” you’ll have to use an RGB color chart or list to specify what color you want the background and the text. You also have to specify which variable strings (temperature labels to go with the temperature data) the Processing sketch should ‘draw.’
Now write the serialEvent section of the sketch to grab the temperature data off the serial port, then use a substring command to reformat the information by removing the period at the end, using the commands:
data = port.readStringUntil(‘.’);
data = data.substring(0, data.length() - 1);
Next you write the code for finding the comma in the string, for fetching the Celsius data and Fahrenheit data (as shown in the video).
Once you’re done writing the Processing sketch as described above, click on the Run icon in the Processing sketch window and your computer should display the temperature currently being
measured by the Microchip temperature sensor, as captured and transmitted by your Arduino. If it doesn’t display the temperature, review your code versus what Jeremy shows in the video and make any needed changes in your code so it matches his code. Good luck on not needing any debugging!
Hope to see you at the July 10th meeting for the Humboldt Microcontrollers Group, 6 - 8 PM at 1385 8th Street, Arcata, California. The main topic for the meeting is discussing the I2C and Processing concepts used in the above temperature sensing exercise, as well as any problems people had with the exercise, and maybe some interesting I2C, Processing, or temperature sensing tips and tricks people know of or discovered in the past two weeks.
**********


